The Toolbar
The toolbar is your primary interface for switching between tools and modes in WEBKNOSSOS. Located at the top of the screen, it provides quick access to essential functions for viewing, annotating, and sharing your work.

The WEBKNOSSOS toolbar contains many useful features for quick access such as Saving and Undo/Redo
Basic Operations
Save and Undo
The save and undo functions help you manage your annotation work:
-
The Save button preserves your current work. While WEBKNOSSOS automatically saves every 30 seconds, you can manually save at any time using the keyboard shortcut Ctrl / Cmd + S.
-
The Undo/Redo buttons let you reverse or restore recent changes. The undo function (Ctrl / Cmd + Z) can revert any changes made in your current session, while redo (Ctrl / Cmd + Y) restores previously undone changes. For accessing older versions of your work, use the "Restore Older Version" feature in the menu.
Position Control
The position control allows precise navigation within your dataset. You can:
- Enter specific coordinates to jump directly to any location
- Copy position values by clicking on the pushpin icon.
- Adjust camera rotation in flight mode
- The position information is automatically included when sharing your view with colleagues
- Quick Share: Generate an immediate sharing link that includes your current view settings. This is ideal for rapid collaboration or when you need to quickly show something to a colleague.
Menu Functions
File Operations
The menu provides several ways to manage your annotations:
-
Download: Export your work in standard formats:
-
Archive: When you need to declutter your dashboard, you can archive annotations you're not actively working on. Archived items remain accessible through the "Show Archived Annotations" filter on your dashboard. Note that this option isn't available for tasks.
-
Restore Older Version: WEBKNOSSOS maintains a complete history of your annotations with version control. You can access previous versions of your work and preview changes before restoring them.
-
Merge Annotations: Combine multiple annotations into one either by project or by annotation ID.
-
Disable Saving: Temporarily disable automatic saving in WEBKNOSSOS. Any changes you make will not be saved. This can reduce bandwidth and resource usage when working with large annotations that don't need to be persisted.
-
Lock Annotation: Lock your current annotation in a read-only mode to protect it from any accidental changes. The annotation remains read-only until you unlock it (from the Annotation dashboard). This can be useful when publishing your work or sharing with larger communities.
Collaboration Tools
WEBKNOSSOS offers multiple ways to share your work:
-
Share: Create customized sharing links that capture your current view, including position, rotation, and zoom level. You can set specific access permissions to control who can view or edit your work. Learn more about sharing options.
-
Screenshots: Capture and download a snapshot of your current viewports as a JPEG image.
Advanced Features
-
Zarr Links: Generate streaming links that allow other applications to access your annotation's image data. This is particularly useful when integrating WEBKNOSSOS with external analysis tools.
-
Create Animation: Produce professional video clips that showcase your dataset. These animations can be valuable for presentations or documentation. Read more about creating animations.
-
Layout: Modify the layout of the WEBKNOSSOS user interface and resize, reorder and adjust viewports and panels to your preferences. Customize the number of columns, show or hide specific tabs, and adjust the size of the sidebar. Save and restore your preferred configurations.
Modes and Toolkits
View Mode
Datasets can be viewed in different view modes. Read more about these here
Toolkits
WEBKNOSSOS offers several tools that you can use to interact with your datasets. By default, all tools are available, but it is also possible to only show a subset of tools. These tool subsets are called "toolkits". Some of these also fine-tune the behavior of the tools so that they are tailored towards a specific use case.
Currently, there are four toolkits available:
- All Tools: This toolkit contains all available tools and is the default.
- Read Only: Only non-editing tools are available (Move, Voxel Pipette, and measurement tools).
- Volume: Only volume tools are listed here.
- Split Segments: This toolkit allows splitting a labeled segment into two parts. Tools in this toolkit behave a bit differently to streamline this workflow. Read more about this toolkit here.
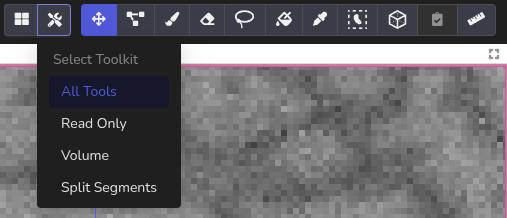
The toolkit dropdown allows selecting a subset of tools tailored for a specific use case.
Annotation Tools
Navigation
 The Move tool serves as your primary means of navigating through the dataset:
- Pan across slices using click and drag
- Zoom in and out to focus on details or get an overview
- Rotate the view in 3D mode
Skeleton Annotation
 The Skeleton tool enables you to create and edit skeleton annotations:
- Place nodes with precise positioning
- Connect nodes to form tree structures
- Add branches and create complex neural tracings
For detailed information, see the skeleton annotation guide.
Volume Annotation
WEBKNOSSOS provides several tools for volume annotation:
 Trace Tool: Create precise boundary definitions by drawing outlines around structures. This tool is particularly useful when accuracy is crucial. For added precision consider using a pen input device.
 Brush Tool: Paint directly onto the dataset to mark regions of interest. The brush size is adjustable to match your needs. If you draw around objects in one continuous motion, the inside will be filled automatically.
 Quick Select: Annotate a segment automatically by drawing a rectangular selection over it. You can also single-click near the center of a structure for fast selection. As an alternative to the AI mode you can use a threshold-based mode for selections.
And many other tools. For detailed information, see the volume annotation guide.
Measurement and Analysis
 Measurement Tool: Use line measurement to calculate distances between points of interest and area measurement to estimate 2D areas. See also statistics for volume annotations.
 Voxel Pipette: Hover over your data to inspect values at a specific voxel. The tooltip shows intensity values for color layers and the segment ID for the visible segmentation layer. Click to pin the tooltip and copy values. Press Shift while clicking to activate the hovered segment ID. This is an alternative to selecting the segment ID in the Segments list sidebar or context menu.
 AI Analysis: Launch automated segmentation processes using various analysis workflows. The AI tools can significantly speed up your annotation work. Learn more about AI-assisted analysis.
 Bounding Box Tool: Create a bounding box to define a region of interest for analysis, subdivide a dataset into smaller regions for built-in automated workflows, or quickly export a region of interest.
To create a bounding box, select the tool and then click and drag with the mouse on one of the 2D viewports. You can resize the bounding box by dragging its corners or edges.
All created bounding boxes are listed in the BBoxes tab in the right-hand sidebar. From there, you can manage your bounding boxes, for example, by renaming, deleting, or jumping to them. Read more about the sidebar tabs in the Object Info and Lists documentation.
- Get Help
- Community Forums
- Email Support